客户端(iOS)集成 1.7.0 Beta2
自定义业务
头像和昵称
设置单聊用户的头像和昵称
- 如果你已经将所有用户Profile信息导入到了IM服务器,则无需通过下面的
setFetchProfileBlockV2:函数设置用户的Profile,IMSDK会自己从IM服务器获取你导入的用户Profile用以显示。 - 如何导入用户Profile?
- 只有你使用了客服功能,或者你并未将用户Profile信息导入到IM服务器,才需要使用下面的代码。否则,请直接注释掉下面的代码。
#warning TODO: JUST COMMENT OUT THE FOLLOWING CODE IF YOU HAVE IMPORTED USER PROFILE INTO IM SERVER
/// 如果你已经将所有的用户Profile都导入到了IM服务器,则可以直接注释掉下面setFetchProfileForPersonBlock:函数,在开发者未设置这个block的情况下,SDK默认会从服务端获取。
/// 或者你还没有将用户Profile导入到IM服务器,则需要参考这里设置setFetchProfileForPersonBlock:中的实现,并修改成你自己获取用户Profile的方式。
/// 如果你使用了客服功能,请参考这里设置setFetchProfileForEServiceBlock:中的实现。
__weak typeof(self) weakSelf = self;
[self.ywIMKit setFetchProfileForPersonBlock:^(YWPerson *aPerson, YWTribe *aTribe, YWProfileProgressBlock aProgressBlock, YWProfileCompletionBlock aCompletionBlock) {
    if (aPerson.personId.length == 0) {
        return ;
    }

    /// Demo中模拟了异步获取Profile的过程,你需要根据实际情况,从你的服务器获取用户profile
    YWProfileItem *item = [YWProfileItem new];
    item.person = aPerson;
    // 如果先获取了部分信息,那么可以通过aProgressBlock回调,可以回调多次
    item.displayName = @"我是昵称";
    aProgressBlock(item);

    // 异步获取其他信息
    dispatch_async(dispatch_get_global_queue(DISPATCH_QUEUE_PRIORITY_DEFAULT, 0), ^{
        // 获取全部信息,通过aCompletionBlock回调,第一个参数为YES时更新缓存,aCompletionBlock只能回调一次,一旦回调后请不要使用aCompletionBlock或者aProgressBlock回调。
        item.avatar = [UIImage imageNamed:@"demo_head_120"];
        aCompletionBlock(YES, item);
    });
}];
类似设置登录能力一样,您需要设置一个回调block,告诉OpenIM如何获取用户的头像和昵称。当OpenIM需要获取头像和昵称时,会调用这个block,让你获取用户的头像和
昵称。
上面的示例中包含了设置单聊的昵称,内部使用dispatch_after模拟网络延迟。
当OpenIM成功获取到用户的头像和昵称后,会将Profile缓存一段时间。关于Profile缓存,请参考下面的小节。
- 注意: 头像和昵称只有当您使用IMKit时才需要设置。如果您使用IMCore来开发自己的UI页面,您不需要设置头像和昵称。
- 注意: 设置头像和昵称的这种方式是被动的,即IMKit需要显示某个Person的头像和昵称时,才会回调这个block来获取。而不是您主动地将哪个用户的Profile设置到IMKit中。请务必理解这一点。
获取头像和昵称
如果你已经将用户的头像和昵称导入到IM服务器,则可以根据需要通过如下API获取:
//同步获取本地profile
- (YWProfileItem *)getProfileForPerson:(YWPerson *)person withTribe:(YWTribe *)tribe;
/**
 *  异步获取本地profile
 *
 *  @param person person
 *  @param tribe  需要查询profile的person所在的群,如果只需要查询这个person的profile,请置为nil。
 */
- (void)getProfileForPerson:(YWPerson *)person
                    withTribe:(YWTribe *)tribe
        withCompletionBlock:(YWProfileCompletionBlock)completionBlock;

/**
 *  异步从服务端获取profile
 *
 *  @param tribe,          目前暂未使用
 *  @param progressBlock   部分结果的回调
 *  @param completionBlock 完成回调
 */
- (void)asyncGetProfileFromServerForPerson:(YWPerson *)person
                                   withTribe:(YWTribe *)tribe
                              withProgress:(YWProfileProgressBlock)progressBlock
                        andCompletionBlock:(YWProfileCompletionBlock)completionBlock;
/**
 *  异步从服务端获取profile, 批量接口
 *  @param persons, 元素类型为YWPerson,单次请求数量不大于100
 */
- (void)asyncGetProfileFromServerForPersons:(NSArray *)persons
                                    withTribe:(YWTribe *)tribe
                        withCompletionBlock:(YWProfilesCompletionBlock)completionBlock;

/**
 *  先获取本地profile,如果本地不存在或者超时,则向服务端请求
 *
 *  @param interval        profile有效期
 */
- (void)getProfileForPerson:(YWPerson *)person withTribe:(YWTribe *)tribe expireInterval:(NSTimeInterval)interval withProgress:(YWProfileProgressBlock)progressBlock andCompletionBlock:(YWProfileCompletionBlock)completionBlock;

/**
 *  先获取本地profile,如果本地不存在或者超时,则向服务端请求, 批量接口
 *  @param persons, 元素类型为YWPerson,单次请求数量不大于100
 */
- (void)getProfileForPersons:(NSArray *)persons withTribe:(YWTribe *)tribe expireInterval:(NSTimeInterval)interval withProgress:(YWProfileProgressBlock)progressBlock andCompletionBlock:(YWProfileCompletionBlock)completionBlock;
Profile缓存
当OpenIM成功获取到用户的头像和昵称后,会将Profile缓存一段时间。
- 如果用户修改了自己的头像和昵称,开发者应该调用YWIMKit的缓存清理接口
removeCachedProfileForPerson:,让IMSDK获取新的Profile。 - 你可以通过YWIMKit的
profileCacheExpireTime属性控制缓存有效时间。 - 设置ProfileBlock相关接口均可在
IYWUIService.h中找到,YWIMKit实例实现了这些接口。 - 获取Profile相关接口均可在
IYWContactService.h中找到。
头像样式
您可以通过如下接口设置头像显示样式:
- (void)exampleSetAvatarStyle
{
    [self.appDelegate.ywIMKit setAvatarImageViewCornerRadius:4.f];
    [self.appDelegate.ywIMKit setAvatarImageViewContentMode:UIViewContentModeScaleAspectFill];
}
会话列表头像点击事件
您可以通过设置YWConversationListViewController的- (void)setAvatarPressedBlock:(YWConversationListAvatarPressedBlock)avatarPressedBlock;,来处理用户点击会话列表中头像的事件。
[controller setAvatarPressedBlock:^(YWConversation *aConv, YWConversationListViewController *aController) {
		/// 你可以根据会话类型,做不同的处理
		...
    }];
聊天页面头像点击事件
您可以通过设置YWIMKit的openProfileBlock回调,来处理用户点击头像的事件,例如:
/**
 * 头像点击事件
 */
- (void)exampleListenOnClickAvatar
{
    [self.appDelegate.ywIMKit setOpenProfileBlock:^(YWPerson *aPerson, UIViewController *aParentController) {
        /// 您可以打开该用户的profile页面
        [[SPUtil sharedInstance] showNotificationInViewController:aParentController title:@"打开profile" subtitle:nil type:SPMessageNotificationTypeMessage];
    }];
}
设置群会话头像和显示名称
类似显示单聊头像的过程,你指定一个Block,IMSDK调用该Block获取任意群会话的头像和显示名称。
/// IM会在需要显示群聊profile时,调用这个block,来获取群聊的头像和昵称
[self.ywIMKit setFetchProfileForTribeBlock:^(YWTribe *aTribe, YWProfileProgressBlock aProgressBlock, YWProfileCompletionBlock aCompletionBlock) {
    dispatch_after(dispatch_time(DISPATCH_TIME_NOW, (int64_t)(2.f * NSEC_PER_SEC)), dispatch_get_main_queue(), ^{
#warning TODO: CHANGE TO YOUR ACTUAL GETTING Tribe Profile METHOD
        /// 用2秒钟的网络延迟,模拟从网络获取群头像
        YWProfileItem *item = [[YWProfileItem alloc] init];
        item.tribe = aTribe;
        item.displayName = aTribe.tribeName;
        item.avatar = [[SPUtil sharedInstance] avatarForTribe:aTribe];
        aCompletionBlock(YES, item);
    });
}];
- 类似单聊的头像和昵称,当你更新群聊Profile时,你可以通过
YWIMKit的removeCachedProfileForTribe:方法,删除某个群会话的Profile缓存
设置自定义会话的头像和显示名称
类似显示群聊头像的过程,你指定一个Block,IMSDK调用该Block获取任意自定义会话的头像和显示名称。
/// IM会在显示自定义会话时,调用此block
[self.ywIMKit setFetchCustomProfileBlock:^(YWConversation *conversation, YWFetchCustomProfileCompletionBlock aCompletionBlock) {
#warning TODO: CHANGE TO YOUR ACTUAL GETTING Custom Conversation Profile METHOD
    if (aCompletionBlock) {

        if ([conversation.conversationId isEqualToString:SPTribeInvitationConversationID]) {
            aCompletionBlock(YES, conversation, @"群系统信息", [UIImage imageNamed:@"demo_group_120"]);
        }
        else {
            aCompletionBlock(YES, conversation, @"自定义会话和置顶功能!", [UIImage imageNamed:@"input_plug_ico_hi_nor"]);
        }
    }
}];
自定义会话列表左滑菜单
会话列表会话节点的cell默认支持两个左滑菜单,删除和置顶,分别是将当前会话删除和置顶的功能,开发者可以通过YWConversationListViewController中的conversationEditActionBlock来实现自定义功能。
自定义消息
您可以使用OpenIM的自定义消息,来发送和展示你业务特定的消息。
例如我们在Demo的输入面板中增加了打招呼的功能,这个功能就是使用自定义消息实现的。
发送自定义消息
发送自定义消息的实现非常简单:
/**
 *  发送自定义消息
 */
- (void)exampleSendCustomMessageWithConversationController:(YWConversationViewController *)aConversationController
{
    /// 构建一个自定义消息
    YWMessageBodyCustomize *body = [[YWMessageBodyCustomize alloc] initWithMessageCustomizeContent:@"Hi!" summary:@"您收到一个招呼"];

    /// 发送该自定义消息
    [aConversationController.conversation asyncSendMessageBody:body progress:^(CGFloat progress, NSString *messageID) {
        NSLog(@"消息发送进度:%lf", progress);
    } completion:^(NSError *error, NSString *messageID) {
        if (error.code == 0) {
            [[SPUtil sharedInstance] showNotificationInViewController:aConversationController title:@"打招呼成功!" subtitle:nil type:SPMessageNotificationTypeSuccess];
        } else {
            [[SPUtil sharedInstance] showNotificationInViewController:aConversationController title:@"打招呼失败!" subtitle:nil type:SPMessageNotificationTypeError];
        }
    }];
}
注意:我们在Demo中简单使用Hi!字符串作为示例,实际上,您需要规划您的自定义消息内容结构,以便做到兼容未来可能出现的更多自定义消息。例如,增加一个type字段,用来表示自定义消息类型;增加一个degrade字段,用来定义如何展示老版本未支持的自定义消息类型。
注意:自定义消息的最大长度限制在1KB以内。实际上您需要尽可能的降低自定义消息体的大小,例如在自定义消息体中只放置消息所需的原数据(id,size等描述信息),并在实际展示该消息时再从服务器加载详情内容。较大的自定义消息会浪费手机流量和性能。
展示自定义消息
您需要如下步骤,完成自定义消息的展示:
- 创建一个自定义消息的
YWBaseBubbleViewModel子类:
顾名思义,ViewModel用来放置从自定义消息体中解析出来的格式化数据。
#import <WXOpenIMSDKFMWK/YWFMWK.h>

@interface SPBubbleViewModelCustomize : YWBaseBubbleViewModel

- (instancetype)initWithMessage:(id<IYWMessage>)aMessage;
/// 自定义消息体
@property (nonatomic, strong, readonly) YWMessageBodyCustomize *bodyCustomize;
@end

@interface SPBubbleViewModelCustomize ()
/// 自定义消息体
@property (nonatomic, strong, readwrite) YWMessageBodyCustomize *bodyCustomize;
@end

@implementation SPBubbleViewModelCustomize

- (instancetype)initWithMessage:(id<IYWMessage>)aMessage
{
    self = [super init];
    if (self) {
        /// 初始化
        /// 记录消息体,您也可以不记录原始消息体,而是将数据解析后,记录解析后的数据
        self.bodyCustomize = (YWMessageBodyCustomize *)[aMessage messageBody];
        /// 设置气泡类型
        self.bubbleStyle = [aMessage outgoing] ? BubbleStyleCoverRight : BubbleStyleCoverLeft;
    }
    return self;
}
@end
注意:我们的示例中非常简单,仅仅是把消息体保存起来。在一般的实际使用场景中,你可能需要根据消息体中的数据(一般为JSON字符串),解析成结构化的数据结构并保持。
- 创建一个自定义消息的
YWBaseBubbleChatView子类:
YWBaseBubbleChatView子类用来实际显示该自定义消息,其实现中包含了如何展示UI的信息:
@interface SPBaseBubbleChatViewCustomize : YWBaseBubbleChatView

@end

@interface SPBaseBubbleChatViewCustomize ()
@property (nonatomic, strong) UILabel *label;
/// 对应的ViewModel
@property (nonatomic, strong, readonly) SPBubbleViewModelCustomize *viewModel;
@end

@implementation SPBaseBubbleChatViewCustomize
- (id)init
{
    self = [super init];

    if (self) {
        /// 初始化
        /// 你可以在这里添加不同的子view
        self.label = [[UILabel alloc] init];
        [self.label setBackgroundColor:[UIColor lightGrayColor]];
        [self.label setTextColor:[UIColor whiteColor]];
        [self.label setFont:[UIFont systemFontOfSize:30.f]];
        [self.label setTextAlignment:NSTextAlignmentCenter];
        [self addSubview:self.label];
    }

    return self;
}
/// 计算尺寸,更新显示
- (CGSize)_calculateAndUpdateFitSize
{
    /// 你可以在这里根据消息的内容,更新子view的显示
    [self.label setText:self.viewModel.bodyCustomize.content];
    [self.label sizeToFit];
    /// 加大内容的边缘,您可以根据您的卡片,调整合适的大小
    CGSize result = self.label.frame.size;
    result.width += 100;
    result.height += 150;
    CGRect frame = self.frame;
    frame.size = result;
    /// 更新frame
    [self setFrame:frame];
    [self.label setCenter:CGPointMake(frame.size.width/2, frame.size.height/2)];

    return result;
}

#pragma mark - YWBaseBubbleChatViewInf

/// 这几个函数是必须实现的
/// 内容区域大小
- (CGSize)getBubbleContentSize
{
    return [self _calculateAndUpdateFitSize];
}
/// 需要刷新BubbleView时会被调用
- (void)updateBubbleView
{
    [self _calculateAndUpdateFitSize];
}
// 返回所持ViewModel类名,用于类型检测
- (NSString *)viewModelClassName
{
    return NSStringFromClass([SPBubbleViewModelCustomize class]);
}
@end
- 告诉OpenIM应该使用上述类型,来展示自定义消息:
在完成以上步骤之后,您需要告知OpenIM使用这些子类来显示自定义消息:
/**
 *  设置如何显示自定义消息
 */
- (void)exampleShowCustomMessageWithConversationController:(YWConversationViewController *)aConversationController
{
    /// 设置用于显示自定义消息的ViewModel
    /// ViewModel,顾名思义,一般用于解析和存储结构化数据
    [aConversationController setHook4BubbleViewModel:^YWBaseBubbleViewModel *(id<IYWMessage> message) {
        if ([[message messageBody] isKindOfClass:[YWMessageBodyCustomize class]]) {
            SPBubbleViewModelCustomize *viewModel = [[SPBubbleViewModelCustomize alloc] initWithMessage:message];
            return viewModel;
        }

        return nil;
    }];

    /// 设置用于显示自定义消息的ChatView
    /// ChatView一般从ViewModel中获取已经解析的数据,用于显示
    [aConversationController setHook4BubbleView:^YWBaseBubbleChatView *(YWBaseBubbleViewModel *message) {
        if ([message isKindOfClass:[SPBubbleViewModelCustomize class]]) {
            SPBaseBubbleChatViewCustomize *chatView = [[SPBaseBubbleChatViewCustomize alloc] init];
            return chatView;
        }

        return nil;
    }];
}
自定义输入插件
目前OpenIM给您提供了定制输入框插件的能力,如下图底部输入区域所示:
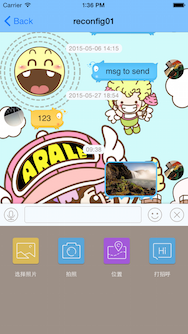
您可以根据您的需要,放入您的自定义输入插件或者OpenIM的内置输入插件。
内置插件
OpenIM目前提供了四个内置插件:
YWInputViewPluginTakePhoto: 拍照并发送图片YWInputViewPluginPhotoPicker: 从相册选择并发送图片YWInputViewPluginLocationPicker: 选择地理位置并发送YWInputViewPluginEmoticonPicker: 表情
使用内置插件
当您使用YWIMKit的openChatWithConversationId:fromController:或者makeConversationViewControllerWithConversationId函数,创建聊天页面时,聊天页面中默认带有以上四个内置插件。
如果您使用YWConversationViewController的makeControllerWithIMKit:conversation:函数,手动创建聊天页面时,这些内置插件不会被默认加入,您可以通过如下方法,添加所需要的内置插件:
__weak YWConversationViewController *weakController = ctr;

    YWInputViewPluginImageBlock imgblk = ^(id plugin, UIImage *image) {
        [weakController sendImageMessage:image];
    };

    YWInputViewPluginLocationBlock lctblk = ^(id plugin, CLLocationCoordinate2D location, NSString *name) {
        YWMessageBodyLocation *messageBody = [[YWMessageBodyLocation alloc] initWithMessageLocation:location locationName:name];
        if (messageBody) {
            [weakController.conversation asyncSendMessageBody:messageBody progress:nil completion:NULL];
        }
    };

    YWInputViewPluginEmoticonPickBlock emtblk = ^(id<YWInputViewPluginProtocol> plugin, YWEmoticon *emoticon, YWEmoticonType type){
    };

    YWInputViewPluginEmoticonSendBlock emtsendblk = ^(id<YWInputViewPluginProtocol> plugin, NSString *sendText){
        // 静态表情或文字
        if (sendText.length > 0) {
            YWMessageBodyText *textMessageBody = [[YWMessageBodyText alloc] initWithMessageText:sendText];
            [weakController.conversation asyncSendMessageBody:textMessageBody progress:nil completion:NULL];
        }
    };

    [ctr.messageInputView addPlugin:[[YWInputViewPluginPhotoPicker alloc] initWithPickerOverBlock:imgblk]];
    [ctr.messageInputView addPlugin:[[YWInputViewPluginTakePhoto alloc] initWithPickerOverBlock:imgblk]];
    [ctr.messageInputView addPlugin:[[YWInputViewPluginLocationPicker alloc] initWithPickerOverBlock:lctblk]];
    [ctr.messageInputView addPlugin:[[YWInputViewPluginEmoticonPicker alloc] initWithPickerOverBlock:emtblk sendBlock:emtsendblk]];
开发自定义输入插件
您可以开发一个自定义的输入插件,当该插件被点击时,OpenIM会将事件回调给你。
- 创建自定义插件类
#import <WXOUIModule/YWUIFMWK.h>
#import <WXOpenIMSDKFMWK/YWFMWK.h>

/**
 *  这个类用于添加输入面板的自定义插件
 */

/// 输入面板的插件,需要遵循YWInputViewPluginProtocol协议
@interface SPInputViewPluginCustomize : NSObject
<YWInputViewPluginProtocol>

// 加载该插件的inputView
@property (nonatomic, weak) YWMessageInputView *inputViewRef;

@end
- 实现
YWInputViewPluginProtocol协议
YWInputViewPluginProtocol协议中包含了自定义插件必须实现的方法,例如点击事件的回调函数、插件的名称、图标等等。
@interface SPInputViewPluginCustomize ()
@property (nonatomic, readonly) YWConversationViewController *conversationViewController;
@end

@implementation SPInputViewPluginCustomize

#pragma mark - properties

- (YWConversationViewController *)conversationViewController
{
    if ([self.inputViewRef.controllerRef isKindOfClass:[YWConversationViewController class]]) {
        return (YWConversationViewController *)self.inputViewRef.controllerRef;
    } else {
        return nil;
    }
}


#pragma mark - YWInputViewPluginProtocol

/**
 * 您需要实现以下方法
 */
// 插件图标
- (UIImage *)pluginIconImage
{
    return [UIImage imageNamed:@"input_plug_ico_hi_nor"];
}
// 插件名称
- (NSString *)pluginName
{
    return @"打招呼";
}
// 插件对应的view,会被加载到inputView上
/// 你必须提供一个固定的view,而不是每次都重新生成,否则在收拢面板时无法移除该view
- (UIView *)pluginContentView
{
    return nil;
}

// 插件被选中运行
/// 你可以在这个里面,调用'YWMessageInputView.h'的'pushContentViewOfPlugin:'函数,控制显示出'pluginContentView'的面板
- (void)pluginDidClicked
{
    [[SPKitExample sharedInstance] exampleSendCustomMessageWithConversationController:self.conversationViewController];
}
@end
- 添加自定义插件
如同添加内置插件一样,您需要将自定义插件添加到聊天页面中。
/**
 *  添加输入面板插件
 */
- (void)exampleAddInputViewPluginToConversationController:(YWConversationViewController *)aConversationController
{
    /// 创建自定义插件
    SPInputViewPluginCustomize *plugin = [[SPInputViewPluginCustomize alloc] init];
    /// 添加插件
    [aConversationController.messageInputView addPlugin:plugin];
}
- 管理插件
您可以调用YWMessageInputView的接口管理插件:
/**
 *  移除某个item
 */
- (void)removePlugin:(id <YWInputViewPluginProtocol>)plugin;
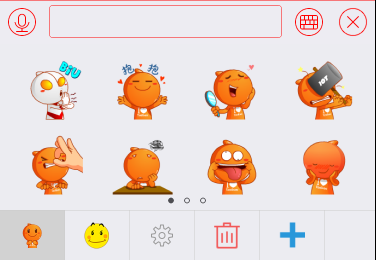
自定义表情
您可以通过YWInputViewPluginEmoticonPicker的接口,管理自定义表情,效果如下图所示:
- 表情包
表情包实际上是一个zip压缩包,格式与旺旺表情包一致。您可以在Demo工程中找到YW_TGZ_Emoitons.emo文件,解压后查看其中的表情资源和配置文件。
- 增加表情分组
/**
 *  设置如何显示自定义表情
 */
- (void)exampleShowCustomEmotionWithConversationController:(YWConversationViewController *)aConversationController
{
    for ( id item in aConversationController.messageInputView.allPluginList )
    {
        if ( ![item isKindOfClass:[YWInputViewPluginEmoticonPicker class]] ) continue;

        YWInputViewPluginEmoticonPicker *emotionPicker = (YWInputViewPluginEmoticonPicker *)item;

        NSString *filePath = [[NSBundle mainBundle] pathForResource:@"YW_TGZ_Emoitons" ofType:@"emo"];
        NSArray *groups = [YWEmoticonGroupLoader emoticonGroupsWithEMOFilePath:filePath];

        for (YWEmoticonGroup *group in groups)
        {
            [emotionPicker addEmoticonGroup:group];
        }
    }
}
- 自定义表情Tab按钮
除了添加表情分组外,你可以添加自定义的Tab按钮,点击后调用你设置的block。一般可以用来弹出表情管理页面。
/// @brief 插入自定义响应处理分组,当该分组被点击调用handleBlock
/// @params groupIcon 待插入分组图标
/// @params index 插入位置索引
/// @params handleBlock 分组点击回调Block
/// @return 成功插入的自定义分组
- (YWEmoticonGroup *)addEmoticonGroupWithIcon:(UIImage *)groupIcon
                   withCustomizedHandleBlock:(YWEmoticonGroupCustomizedHandleBlock)handleBlock;
- 移除表情
/// @brief 移除表情分组
/// @params group 待插入分组
/// @return 是否成功移除
- (BOOL)removeEmoticonGroup:(YWEmoticonGroup *)group;
自定义消息长按菜单
你可以设置IMSDK在会话列表中显示的消息长按菜单,这个通过回调机制实现。
当IMSDK需要显示某个消息的长按菜单时,通过你设置的回调,来获取需要显示的菜单名称及按下回调函数。
示例代码如下所示:
/**
 *  设置消息的长按菜单
 *  这个方法展示如何设置图片消息的长按菜单
 */
- (void)exampleSetMessageMenuToConversationController:(YWConversationViewController *)aConversationController
{
    __weak typeof(self) weakSelf = self;
    [aConversationController setMessageCustomMenuItemsBlock:^NSArray *(id<IYWMessage> aMessage) {
        if ([[aMessage messageBody] isKindOfClass:[YWMessageBodyImage class]]) {
            YWMessageBodyImage *bodyImage = (YWMessageBodyImage *)[aMessage messageBody];
            if (bodyImage.originalImageType == YWMessageBodyImageTypeNormal) {
                /// 对于普通图片,我们增加一个保存按钮
                return @[[[YWMoreActionItem alloc] initWithActionName:@"保存" actionBlock:^(NSDictionary *aUserInfo) {
                    NSString *messageId = aUserInfo[YWConversationMessageCustomMenuItemUserInfoKeyMessageId]; /// 获取长按的MessageId
                    YWConversationViewController *conversationController = aUserInfo[YWConversationMessageCustomMenuItemUserInfoKeyController]; /// 获取会话Controller
                    id<IYWMessage> message = [conversationController.conversation fetchMessageWithMessageId:messageId];
                    message = [message conformsToProtocol:@protocol(IYWMessage)] ? message : nil;
                    if ([[message messageBody] isKindOfClass:[YWMessageBodyImage class]]) {
                        YWMessageBodyImage *bodyImage = (YWMessageBodyImage *)[message messageBody];
                        NSArray *forRetain = @[bodyImage];
                        [bodyImage asyncGetOriginalImageWithProgress:^(CGFloat progress) {
                            ;
                        } completion:^(NSData *imageData, NSError *aError) {
                            /// 下载成功后保存
                            UIImage *img = [UIImage imageWithData:imageData];
                            if (img) {
                                UIImageWriteToSavedPhotosAlbum(img, weakSelf, @selector(image:didFinishSavingWithError:contextInfo:), NULL);
                            }
                            [forRetain count]; /// 用于防止bodyImage被释放
                        }];
                    }
                }]];
            }
        }
        return nil;
    }];
}
本地自定义会话
你可以在IMSDK的会话列表,插入你的自定义会话,你可以设置这些会话的头像、显示名称、最后消息描述、最后消息时间及未读数。当用户点击这些自定义会话时,你可以通过YWConversationListViewController的didSelectItemBlock方法,决定需要展示的页面。
注意:自定义会话的Id必须以kYWCustomConversationIdPrefix前缀开始,否则无法插入成功。
下面的代码展示了插入一个自定义会话,会话的信息随机选择。
/**
 *  添加或者更新自定义会话
 */
- (void)exampleAddOrUpdateCustomConversation
{
    NSInteger random = arc4random()%100;
    static NSArray *contentArray = nil;
    if (contentArray == nil) {
        contentArray = @[@"欢迎使用OpenIM", @"新的开始", @"完美的APP", @"请点击我"];
    }
    YWCustomConversation *conversation = [YWCustomConversation fetchConversationByConversationId:@"ywcustom007" creatIfNotExist:YES baseContext:[SPKitExample sharedInstance].ywIMKit.IMCore];
    /// 每一次点击都随机的展示未读数和最后消息
    [conversation modifyUnreadCount:@(random) latestContent:contentArray[random%4] latestTime:[NSDate date]];
}
会话置顶功能
你可以通过如下的方式将会话置顶:
/**
 *  将会话置顶
 */
- (void)exampleMarkConversationOnTop:(YWConversation *)aConversation onTop:(BOOL)aOnTop
{
    NSError *error = nil;
    [aConversation markConversationOnTop:aOnTop getError:&error];
    if (error) {
        [[SPUtil sharedInstance] showNotificationInViewController:nil title:@"自定义消息置顶失败" subtitle:nil type:SPMessageNotificationTypeError];
    }
}
注意:你可以在OpenIM-Theme.plist中使用ConversationList-MarkOnTop-BackgroundColor和ConversationList-MarkOnTop-SeperatorColor来设置被置顶会话的背景色和分割线颜色。
国际化与本地化
iOS OpenIMSDK目前已经在核心流程(聊天、会话及相关页面)中支持国际化,开发者可以通过非常少的工作量来支持本地化,只需要关注WXOUIModuleResources.bundle中zh-Hans.lproj文件夹中的Localizable.strings文件即可。
这个文件在每次SDK正式版本发布时是增量更新的,新增的内容置于文件的末尾并有时间注释,保证开发者可以迅速定位新增键值对。
如果开发者需要支持中文外的其他语言,比如英语,只需要三步:
1、查看工程中是否存在打包时copy到mainBundle的英文Localizable.strings文件,如果没有则添加,如果有看第2步;
2、将WXOUIModuleResources.bundle中zh-Hans.lproj文件夹中的Localizable.strings文件内容copy到1中的英文Localizable.strings文件;
3、将新增的内容的值翻译为英文。
如果开发者接入的是Core层SDK,开发者可以选择自己设置用户看到的所有内容,也可以通过相同的三步实现本地化。
目前在违禁词、被加入黑名单和Push场景下的国际化工作将在下一个版本解决。
输入区域插件自定义
对于输入区域的插件位置和顺序可以完全自定义。
位置自定义
开发者可以对默认的插件或者自己的插件(实现了YWInputViewPluginProtocol)通过设置
// 插件位置,默认为YWInputViewPluginPositionMorePanel
@property (nonatomic, assign) YWInputViewPluginPosition pluginPosition;
这个属性来实现位置的自定义,目前支持三种位置:
typedef NS_ENUM(NSUInteger, YWInputViewPluginPosition) {
    YWInputViewPluginPositionMorePanel,     // 位于点击输入框下方的可展开区域
    YWInputViewPluginPositionLeft,          // 位于输入框的左侧,用于前置插件
    YWInputViewPluginPositionRight,         // 位于输入框的右侧,用于前置插件
};
顺序自定义
对于默认的YWMessageInputView,插件显示的顺序与addPlugin:的顺序保持一致,开发者可以通过这个方法实现顺序的自定义。
当使用
/**
 *  通过会话Id构建聊天页面
 *  @param aConversationId 会话Id
 *  @return 聊天页面
 */
- (YWConversationViewController *)makeConversationViewControllerWithConversationId:(NSString *)aConversationId;
这个方法打开聊天界面时,是带有默认插件的,开发者可以通过YWMessageInputView的removeAllPlugins方法移除。
在YWMessageInputView中输入框中的TextView是一定存在的,并随着插件数量自动调整宽度,由于文本输入区域有最小的宽度(目前是80)。请注意输入框左右的插件不要太多,当留给文本输入区域的宽度少于80时的行为是未定义的。
IMKit的其他事件及属性
监听新消息
您可以通过YWIMKit的setOnNewMessageBlock的回调,来监听新消息的到来,以便提醒用户,例如:
/**
 *  监听新消息
 */
- (void)exampleListenNewMessage
{
    [self.appDelegate.ywIMKit setOnNewMessageBlock:^(NSString *aSenderId, NSString *aContent, NSInteger aType, NSDate *aTime) {
        /// 你可以播放您的提示音
    }];
}
打开链接
当用户打开消息中的链接时,OpenIM会通过回调告诉你,您需要设置这个回调block:
/// 设置打开链接的回调
[[self.baseContext getUIService] setOpenURLBlock:^(NSString *aURLString, UIViewController *aParentController) {
  UIAlertView *av = [[UIAlertView alloc] initWithTitle:@"打开url" message:[NSString stringWithFormat:@"url:%@\ncontroller:%@", aURLString, aParentController] delegate:nil cancelButtonTitle:@"好的" otherButtonTitles:nil];
  [av show];
}];
预览大图
如果您需要自己处理预览大图的事件,可以通过如下接口设置:
/**
 *  预览大图事件
 */
- (void)exampleListenOnPreviewImage
{
    __weak typeof(self) weakSelf = self;

    [self.appDelegate.ywIMKit setPreviewImageMessageBlockV2:^(id<IYWMessage> aMessage, YWConversation *aOfConversation, UIViewController *aFromController) {

        /// 增加更多按钮,例如转发
        YWMoreActionItem *transferItem = [[YWMoreActionItem alloc] initWithActionName:@"转发" actionBlock:^(NSDictionary *aUserInfo) {
            /// 获取会话及消息相关信息
            NSString *convId = aUserInfo[YWImageBrowserHelperActionKeyConversationId];
            NSString *msgId = aUserInfo[YWImageBrowserHelperActionKeyMessageId];

            YWConversation *conv = [[weakSelf.appDelegate.ywIMKit.IMCore getConversationService] fetchConversationByConversationId:convId];
            if (conv) {
                id<IYWMessage> msg = [conv fetchMessageWithMessageId:msgId];
                if (msg) {
                    YWP2PConversation *targetConv = [YWP2PConversation fetchConversationByPerson:[[YWPerson alloc] initWithPersonId:@"jiakuipro003"] creatIfNotExist:YES baseContext:weakSelf.appDelegate.ywIMKit.IMCore];
                    [targetConv asyncForwardMessage:msg progress:NULL completion:^(NSError *error, NSString *messageID) {
                        NSLog(@"转发结果:%@", error.code == 0 ? @"成功" : @"失败");
                    }];
                }
            }
        }];


        /// 打开IMSDK提供的预览大图界面
        [YWImageBrowserHelper previewImageMessage:aMessage conversation:aOfConversation inNavigationController:aFromController.navigationController additionalActions:@[transferItem]];
    }];
}
消息未读数
您可以从YWIMKit的getTotalUnreadCount接口中获取当前总的未读消息数目。